How to Swiftly Launch a Free Website With GitHub Pages
No programming or cost involved! Pick a theme, configure it, then pour in your content!

Creating a website can seem overwhelming. Even with a programming background, you may lose yourself on the web trying to find where to begin.
So here is my promise to you. At the end of the article, you’ll get:
-
An elegant website deployed at no cost — not even hosting.
-
A comment block to let your readers engage with your articles.
-
A mailing subscription list to inform your visitors about new content you’ve published.
-
Analytics tools to track your readers’ behaviors.
-
And more depending on how advanced your theme is.
I’ll tease you with the website I recently launched. Looks cool, right?
It required some time and research to come up with this. You’ll find many articles dealing with static site generators such as Jekyll or Hugo. I spent most of my time scraping information here and there. I needed a complete guide. So I’ve decided to cram all this knowledge into one central article.
With this compilation, you should finish in a couple of hours! And trust me, you’ll spend most of it deciding on the right theme.
Still onboard? Let’s get started!
Prerequisites
I mentioned earlier that your website wouldn’t cost you a dime. That’s thanks to GitHub Pages.
You only need to create a GitHub account where you’ll host your website for free. GitHub handles both the versioning and deployment. How convenient!
And you don’t even need to know HTML/CSS — although it’s a plus. GitHub Pages uses Jekyll to let you focus on your content by converting your Markdown files into HTML.
So the prerequisites are:
-
Have a GitHub account.
-
Have a basic understanding of Git. You don’t need to be a pro. You could even do it from the GitHub web interface.
-
Know how to use Markdown — that’s a no-brainer with the official cheat sheet.
If you’re OK with this, let’s proceed to the exciting part!
Pick Your Theme
The most important part of this guide! Take the time to select an elegant template that fits your needs.
You can find heaps of free themes. They’re well documented and address many use cases, whether you want to build a blog or a portfolio. Nothing is preventing you from investing in a premium theme. I still feel like I’m delivering on my promise so far.
You should find what suits you here:
[**Free Themes Jekyll Themes**](https://jekyll-themes.com/free/)
For instance, I selected the Mediumish theme for my blog. All credit goes to WowThemes for creating this fantastic template for free.
Navigate through the list. Have a peek with the “Live Demo” button. Then single out the one you want!
Deploy Your Website
Let’s assume you have created a GitHub account. If you had a peek at the GitHub Pages documentation, you could create a Git repository named your_username.github.io.
Instead, let’s fast-forward and skip all the setup process. After all, that’s why you picked a theme. You don’t want to spend days setting everything up.
Fork the Git repository from the template you have selected. You should have a link on the template’s page. That will create a copy of the Git repository where you’ll plug your content.
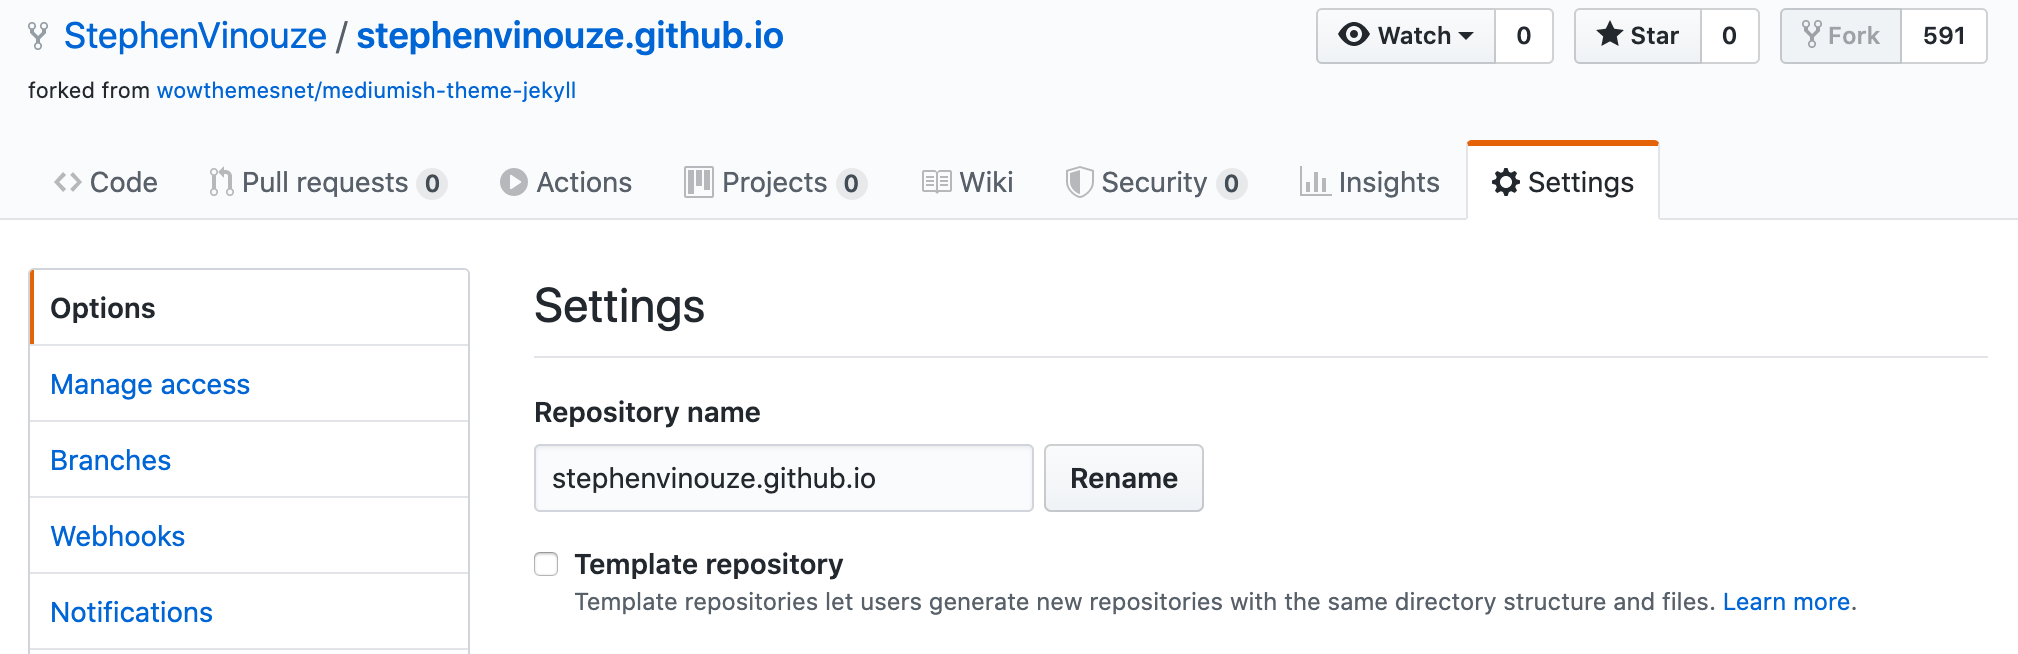
Once forked, you’ll need to change your repository’s name to match your_username.github.io. Go to “Settings,” then rename your repository.
Try it out! Your website is already waiting for you! Open a tab in your browser and enter the URL http://your_username.github.io/ (where you’ll replace your_username with yours).
If you feel lost at any time, don’t hesitate to compare your repository with mine.
Prepare Your Versioning
GitHub deploys your website from your master branch. Understand that every change you push on master will redeploy it.
So before starting anything, I urge you to create a develop branch. All your changes won’t affect your website until you merge develop into master.
By using a develop branch, you can start experimenting without worrying about breaking your website.
Test Your Changes
You still want to see how your website behaves while configuring it from the develop branch. To deploy it locally, open a new tab in your terminal. Use the following command from where you cloned your Git repository:
1
$ bundle exec jekyll serve — watch
Then open your browser at this address: http://localhost:4000/.
You can leave this terminal tab aside. Your website will run on your machine until you stop this process.
Configure Your Website
As it stands, your website remains an empty shell filled with the template’s content. Let’s configure it with your data.
Note: I’d recommend taking this as a guide. Not all themes have the same configuration. What I’m writing may not apply to you if you have picked a different theme than mine. Always double-check with the theme’s documentation.
First, have a look inside the _config.yml file. That’s where the magic happens. You’ll find several parameters you’ll need to update with yours.
You can already configure a few things on your own, such as:
-
Contact info
-
Avatar
-
Social network links
Restart your Jekyll process, then refresh your page to see the changes appear.
As a heads-up, when you change the _config.yml file, you must restart the Jekyll process you started earlier. For all other changes, only refresh your page.
Publish Your Articles
It’s about time you replace the template’s articles with yours.
Before getting to that, understand that name conventions drive Jekyll. In that regard, all articles:
-
Are stored inside the
_postsfolder. -
Are named with a
yyyy-mm-dd-name-of-your-post.mdsyntax. -
Must be written in the Markdown language (hence the
.mdfile extension).
Try it out! Create a file inside the _posts folder with an appropriate name. Finally, refresh and see your article displayed on your website.
“What if I already have a Medium article and would like to convert it into Markdown?”
You can find a few solutions. I’d recommend this easy-to-use converter.
As a side note, it doesn’t handle Gist. You’ll need to extract it manually. Nothing complicated, though. Right-click on your Medium Gist and copy the <script> tag containing the link inside.
For more information, you should check out this well-explained article.
Interact With Your Readers
If you have decided to create a blog, you should consider displaying a comments section. You want your readers to engage with your articles.
Many themes support Disqus. It embeds a comments section wherever you want to include it. To configure it, you must:
-
Create a Disqus account — you can start with the free plan.
-
Choose a website name as a unique ID and enter your website’s URL.
-
Replace the Disqus value inside the
_config.ymlfile with your Disqus website name.
In the screenshot below, you can see the Disqus configuration for my website. In my _config.yml file, I’ve edited my Disqus value to stephenvinouze:
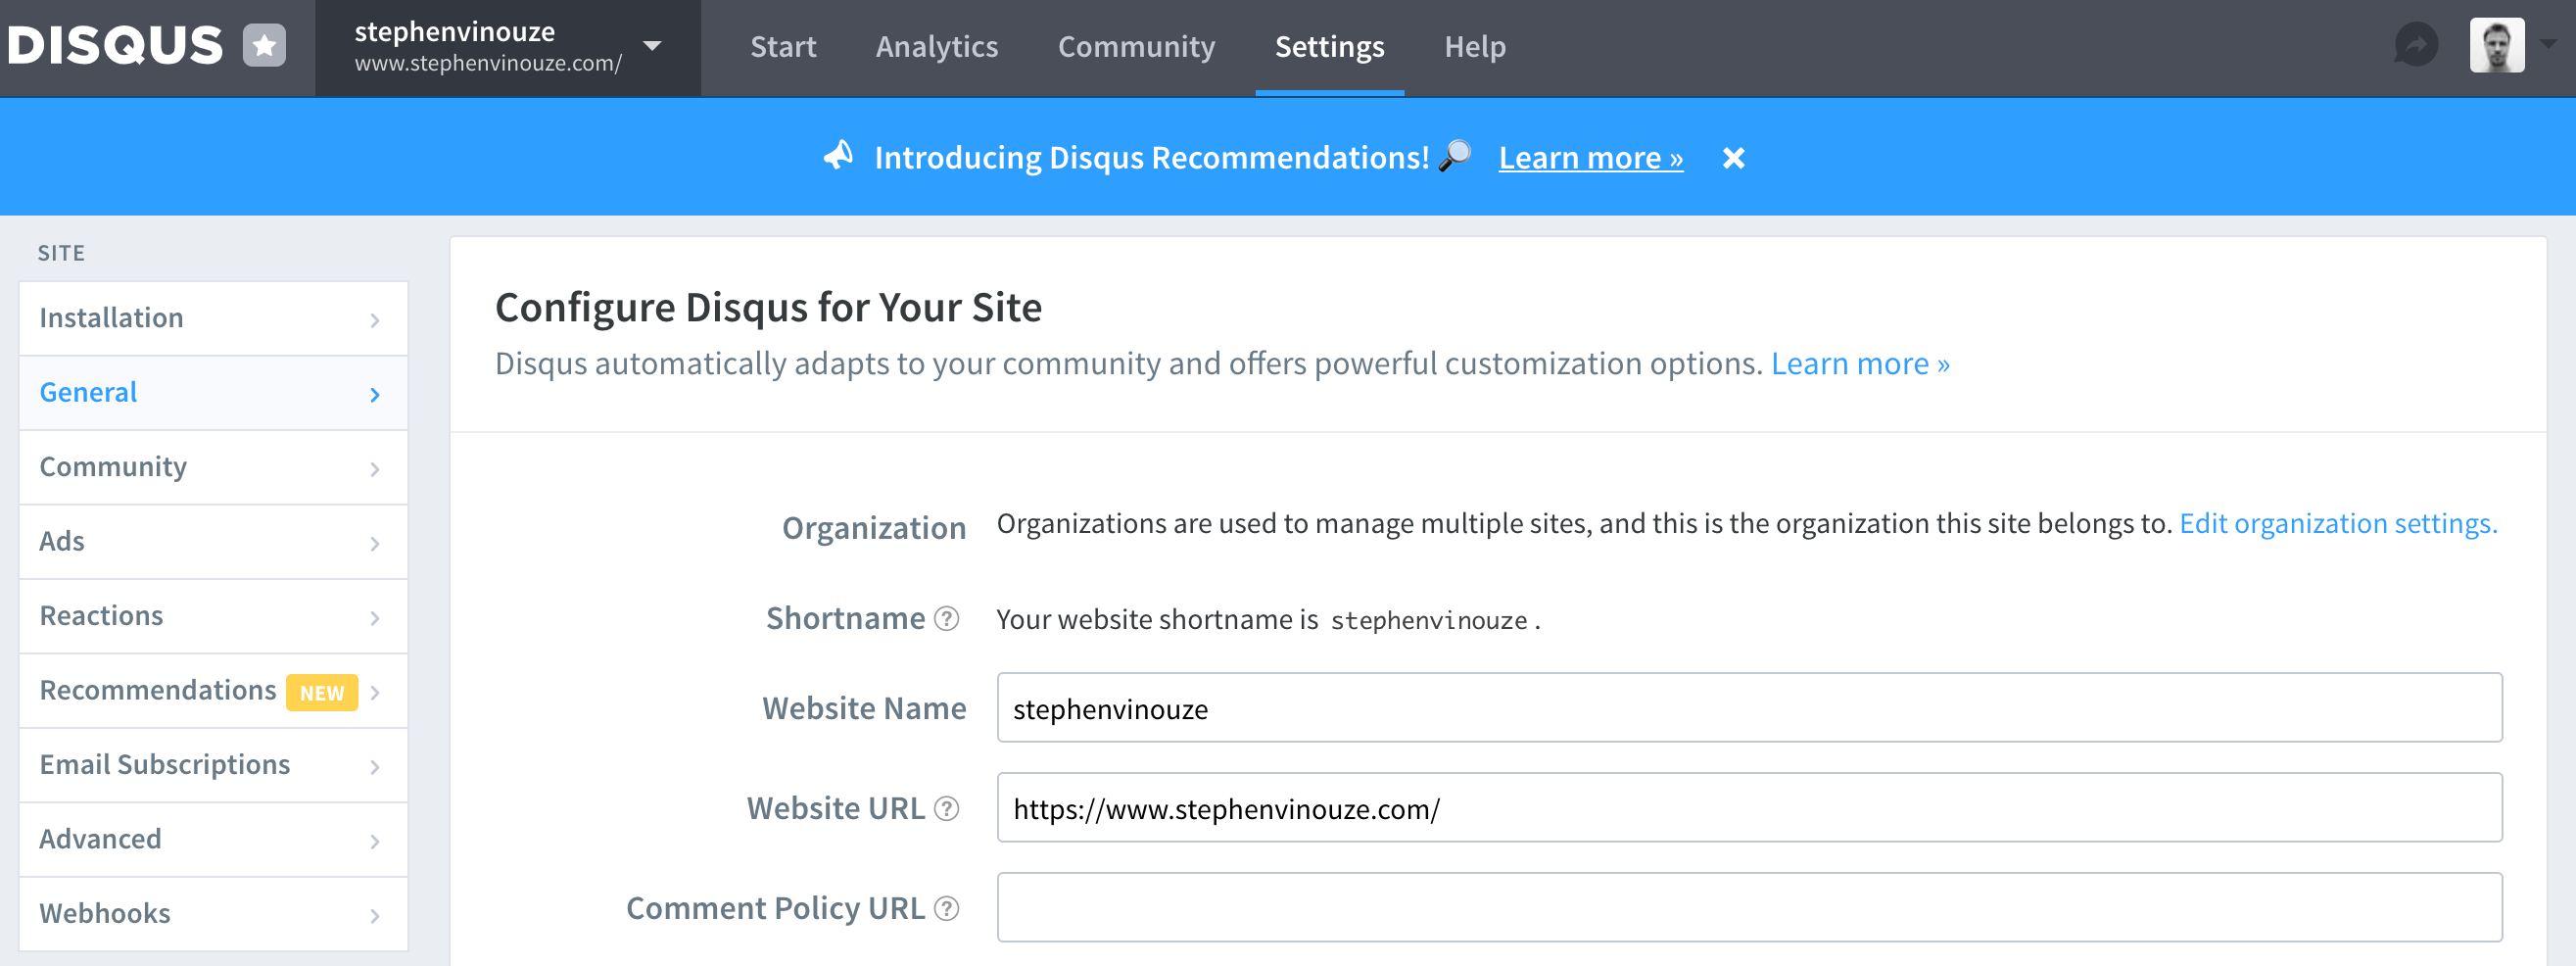
You may notice my URL isn’t https://stephenvinouze.github.io/. I’ll explain why later in the article. For now, you should use your GitHub URL.
Also, you should be aware that Disqus will never work on your machine since you’ve indicated your production URL above.
Remember, you’ve been working on the develop branch. If you have committed and pushed what you’ve done so far — which you should have — your production website won’t be redeployed. If you want to ensure Disqus is working, you must merge develop into master. Then you can check your production URL (it can take some time for your website to be deployed).
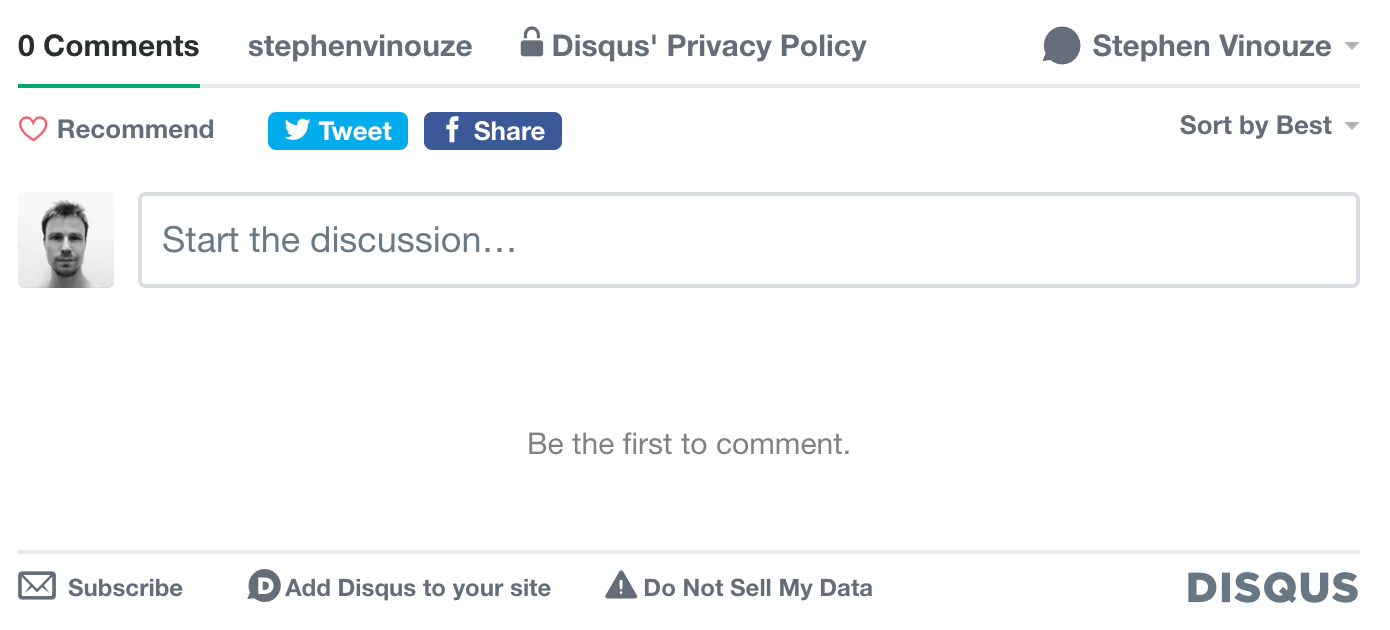
You should see a comments block like the one below:
Hook Your Visitors
Retention should be one of your priorities. You’ll compete with the whole internet in trying to make yourself heard through the crowd. What makes someone visit your website? Better yet, why should they stay and come back?
You may have heard about SEO. Unfortunately, I’m not qualified to help you with this topic. Rest assured, you’ll find many articles to give you a lift. Several templates are said to be SEO-optimized. I wouldn’t count too much on that.
Aside from SEO, you could invite visitors to stay tuned to your upcoming articles. You’ll find several mechanisms to achieve this. A popular one is called Mailchimp. Just as with Disqus, you can embed an HTML form that will notify your users when you publish an article. And many themes already include Mailchimp. Sweet, right?
Sadly, configuring Mailchimp is not straightforward. I spent a non-negligible amount of time wandering inside their dashboard.
My theme required me to add a subscription list link from Mailchimp. I’ll assume you have the same requirement. I’ll guide you through the configuration steps.
Like with Disqus, create an account, choose the free plan, and answer the questions.
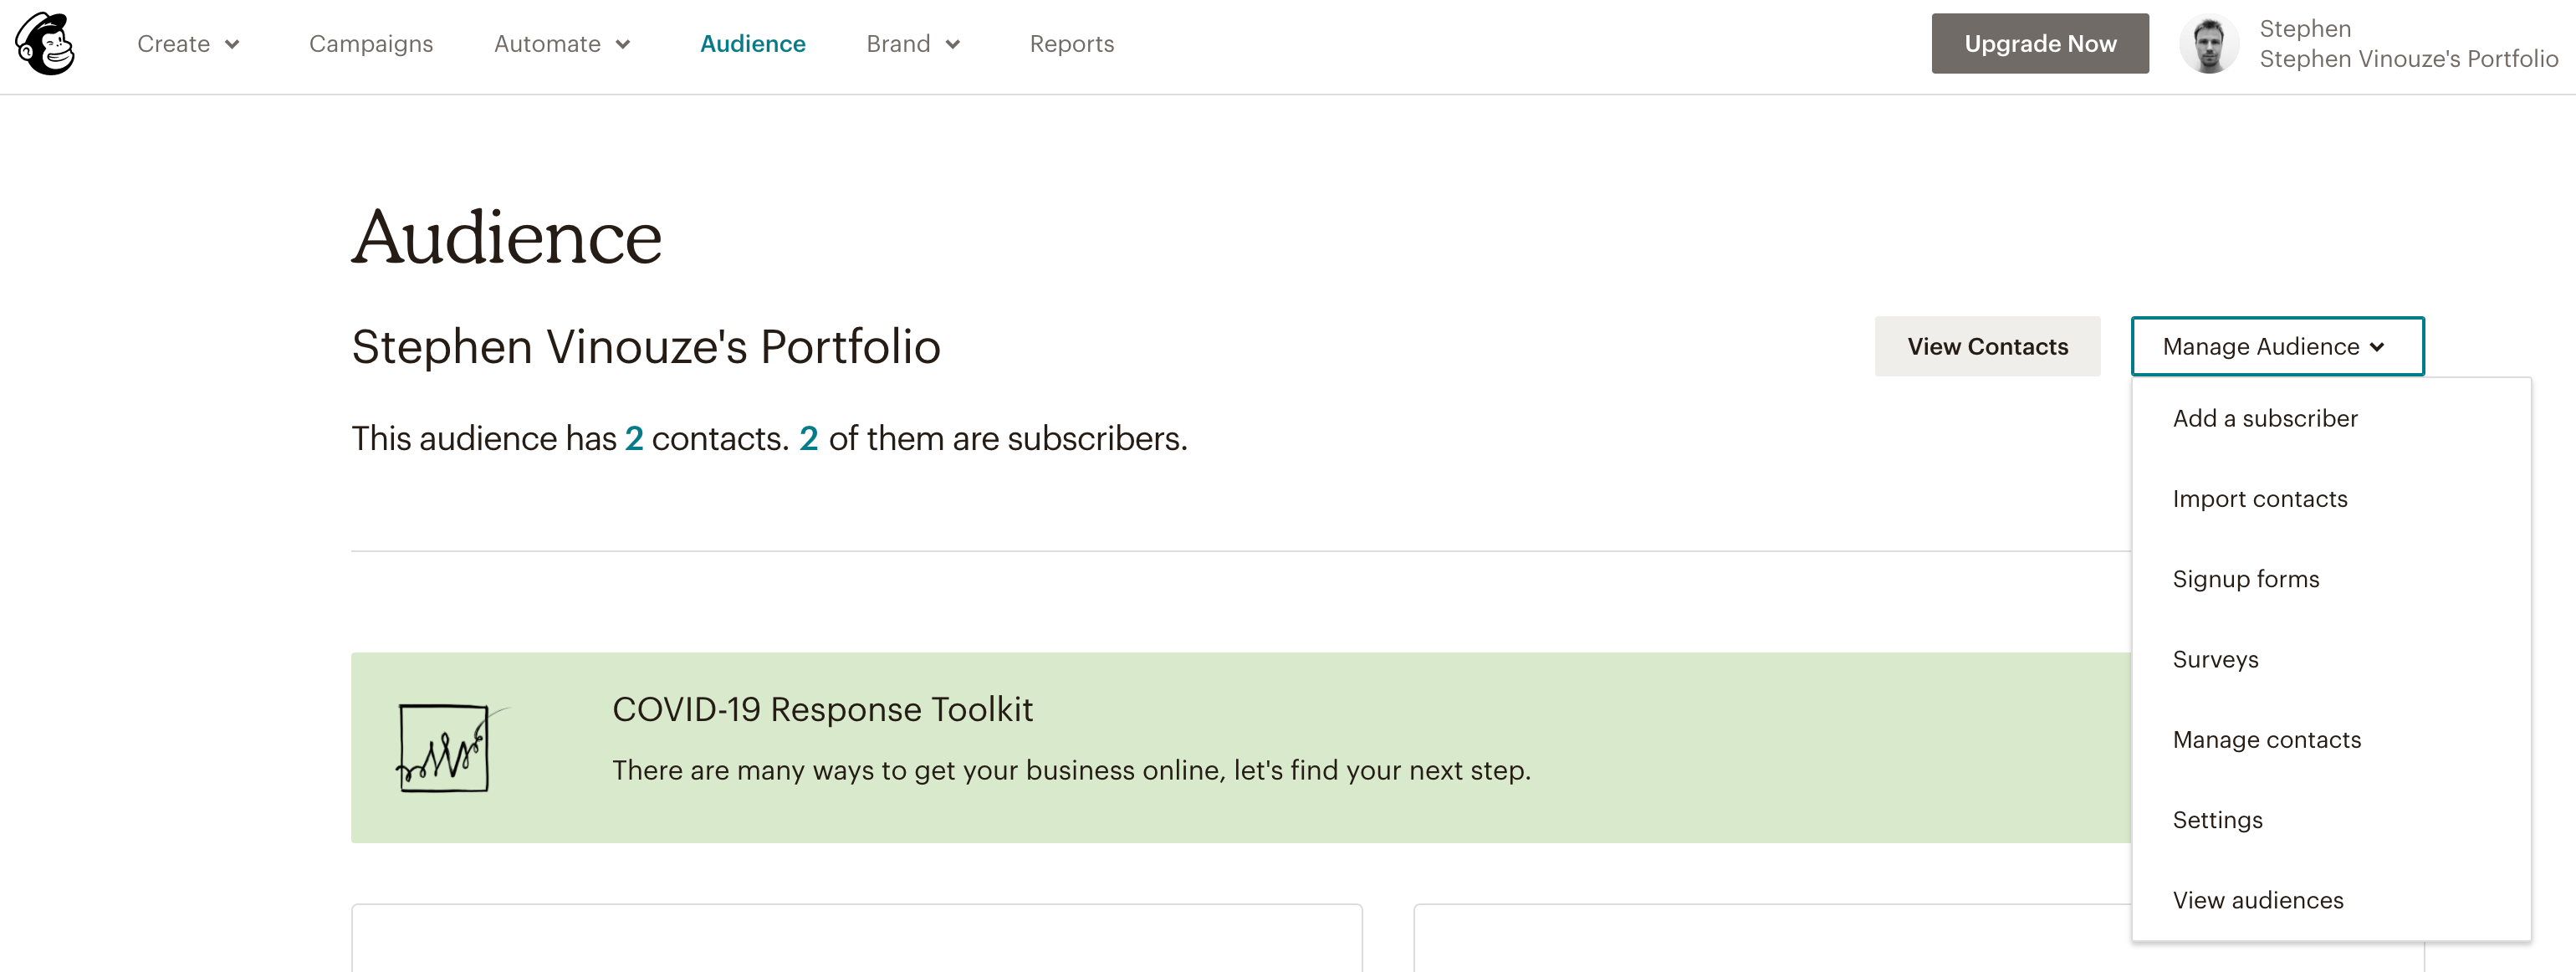
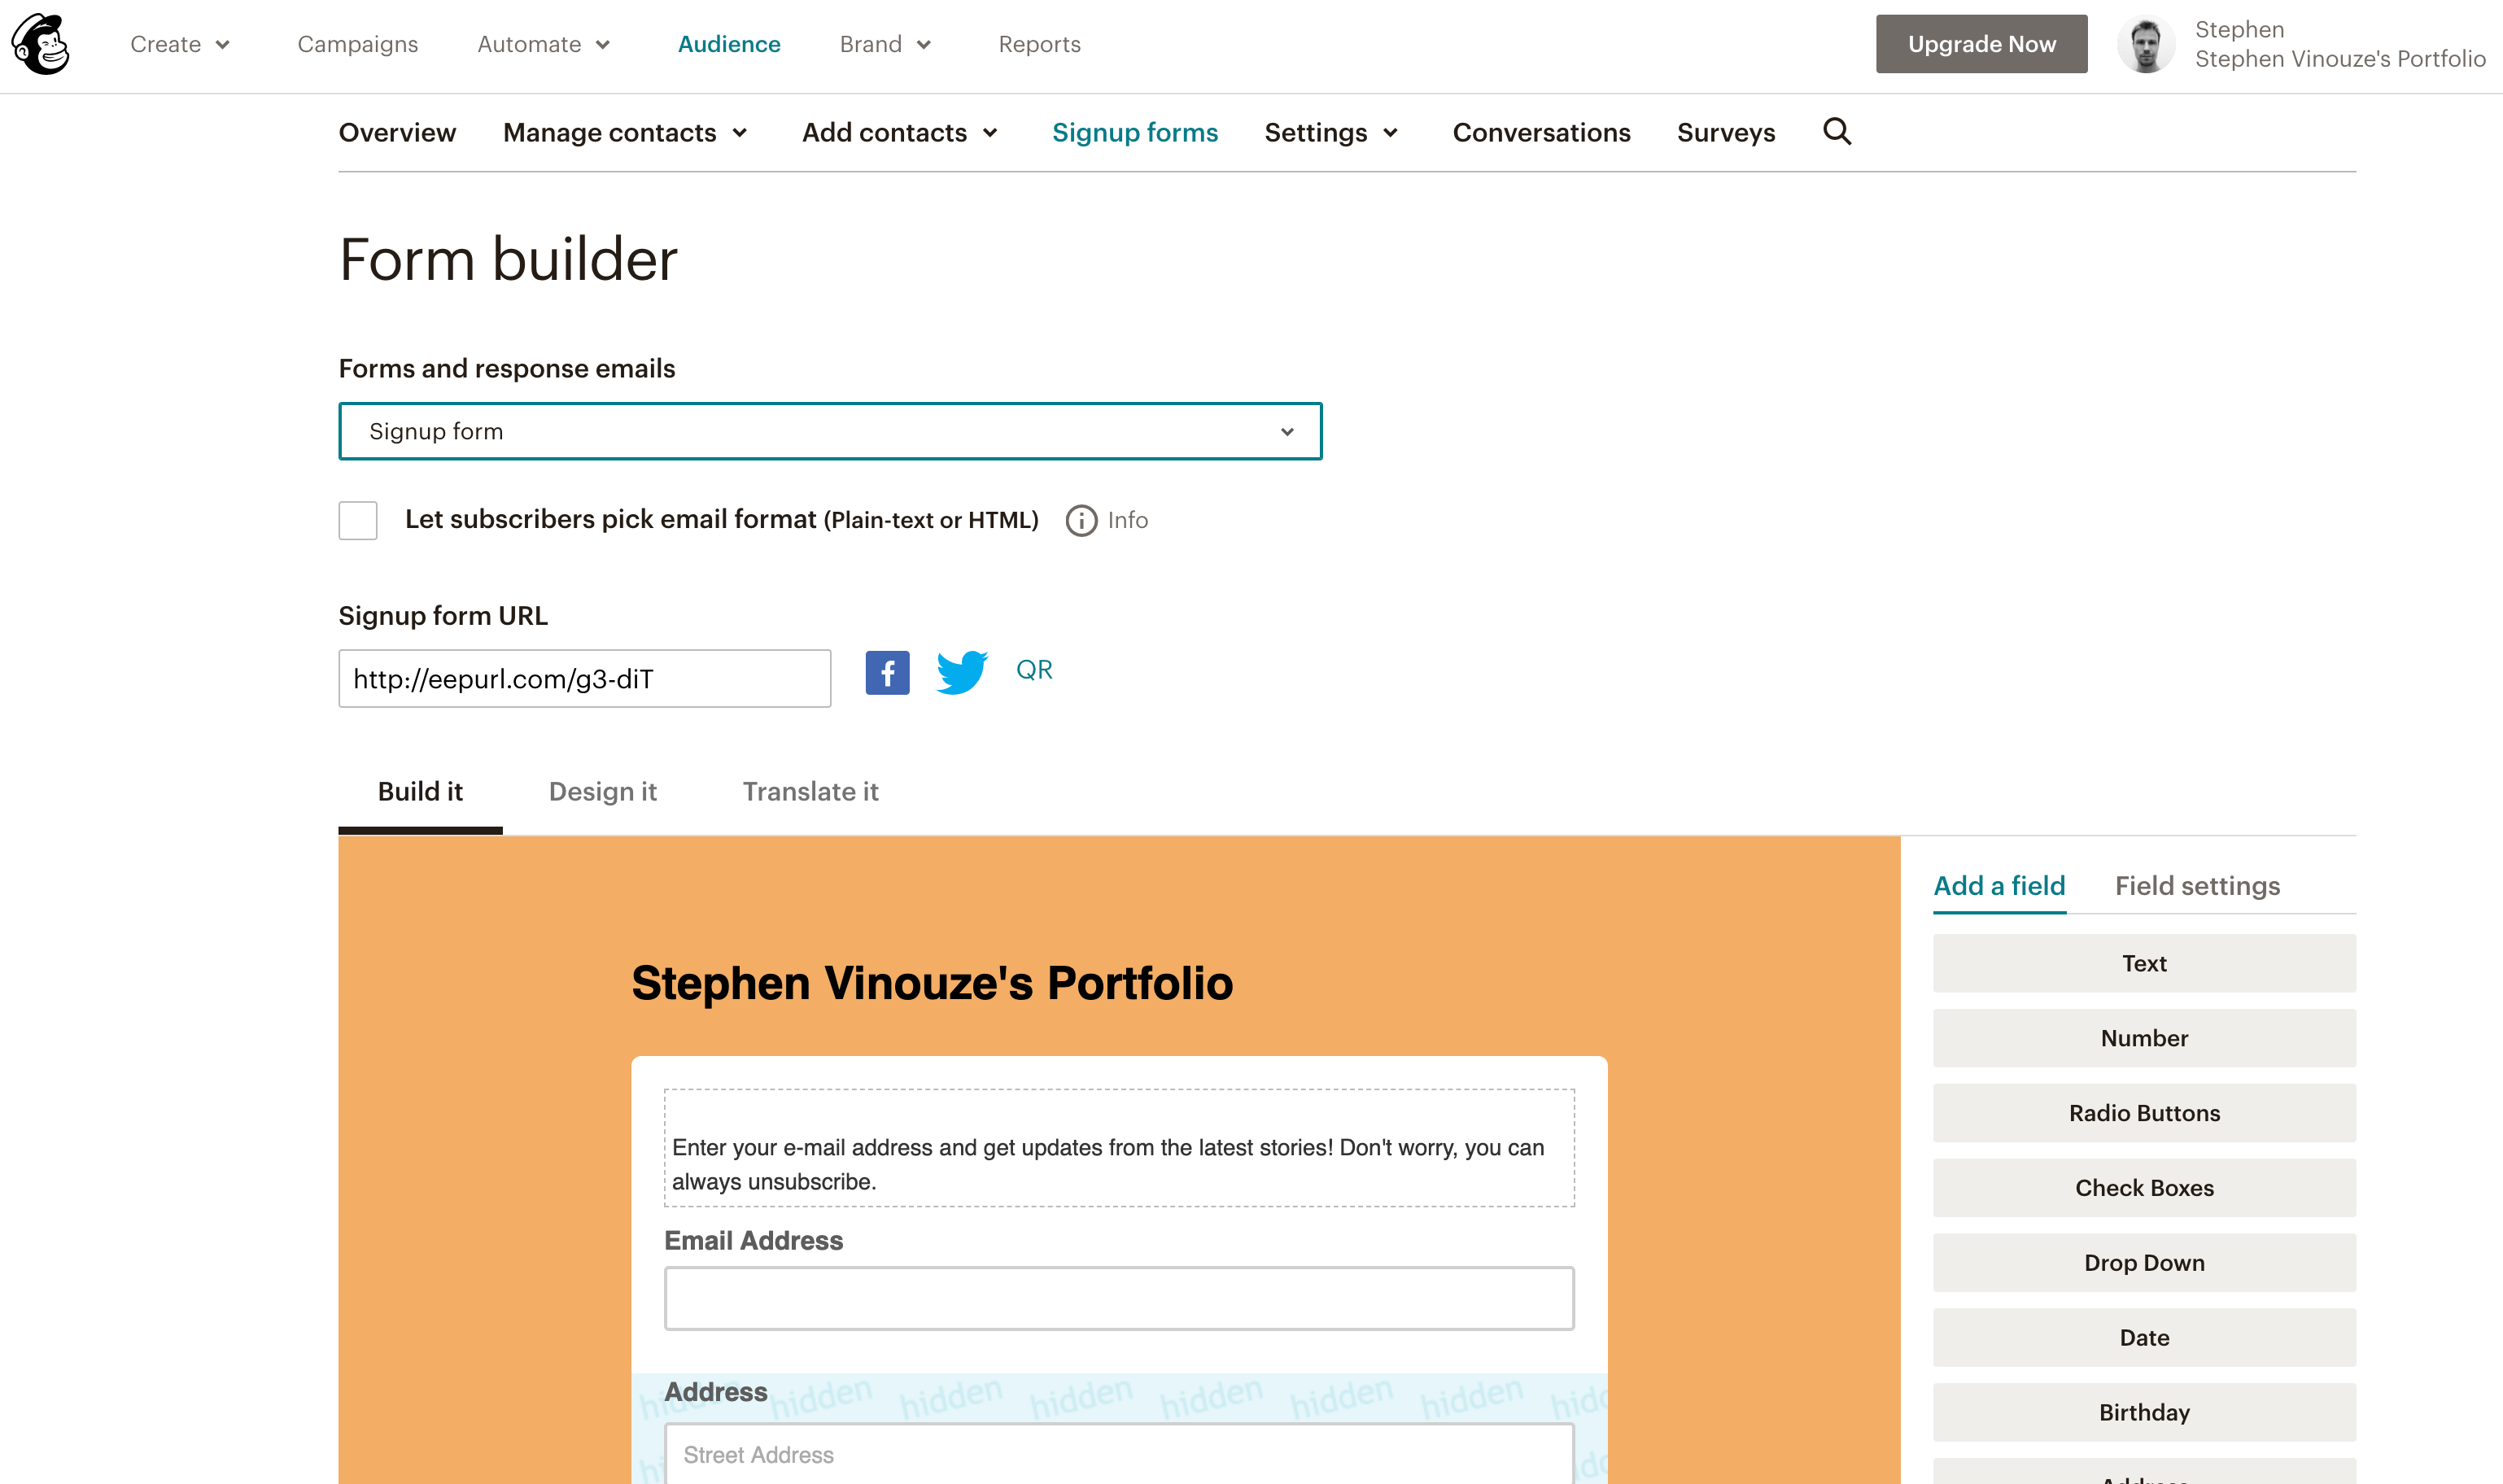
Now, select “Audience.” You’ll find on the right side a panel named “Manage Audience.” Toggle it and press “Signup forms.”
Pick the first item called “Form builder.” You’ve reached the place where you can conceive your subscription forms. That’s the page your users will see when they click on your website’s “Subscribe” button. You’ll want to add a personal touch to it.
Mailchimp allows you to change the layout of the form as well as the fields you want your users to fill. If you don’t want to scare them off, make it as light as possible. A single email field is enough to hook them.
To connect your form to your website, copy the short link displayed in the “Signup form URL.” Open it in a browser to see what your form looks like. You can copy-paste the full URL into your project to finish this part.
If you want to go further, you can customize your other forms. On that same page, locate the “Signup form” panel at the top above the checkbox. This dropdown list shows all the forms your visitors will see when interacting with your mailing list.
I’ll leave that to your creativity. Right now, you should have your subscription mailing list working. Remember to push your modification to the master branch to apply your changes.
Track Your Users
Tracking is one aspect your users will never see. And yet you’d be wrong to neglect it.
Google Analytics can help you analyze your users’ behaviors. You’ll want to know how your users navigate on your website and which articles perform well.
Most of the templates already integrate Google Analytics to track page views. If yours doesn’t, the guide below will show you how to do so:
Learn how to add Google Analytics tracking code to your Jekyll static website. Google Analytics is a free web analytics service offered by Google that tracks and reports website traffic.
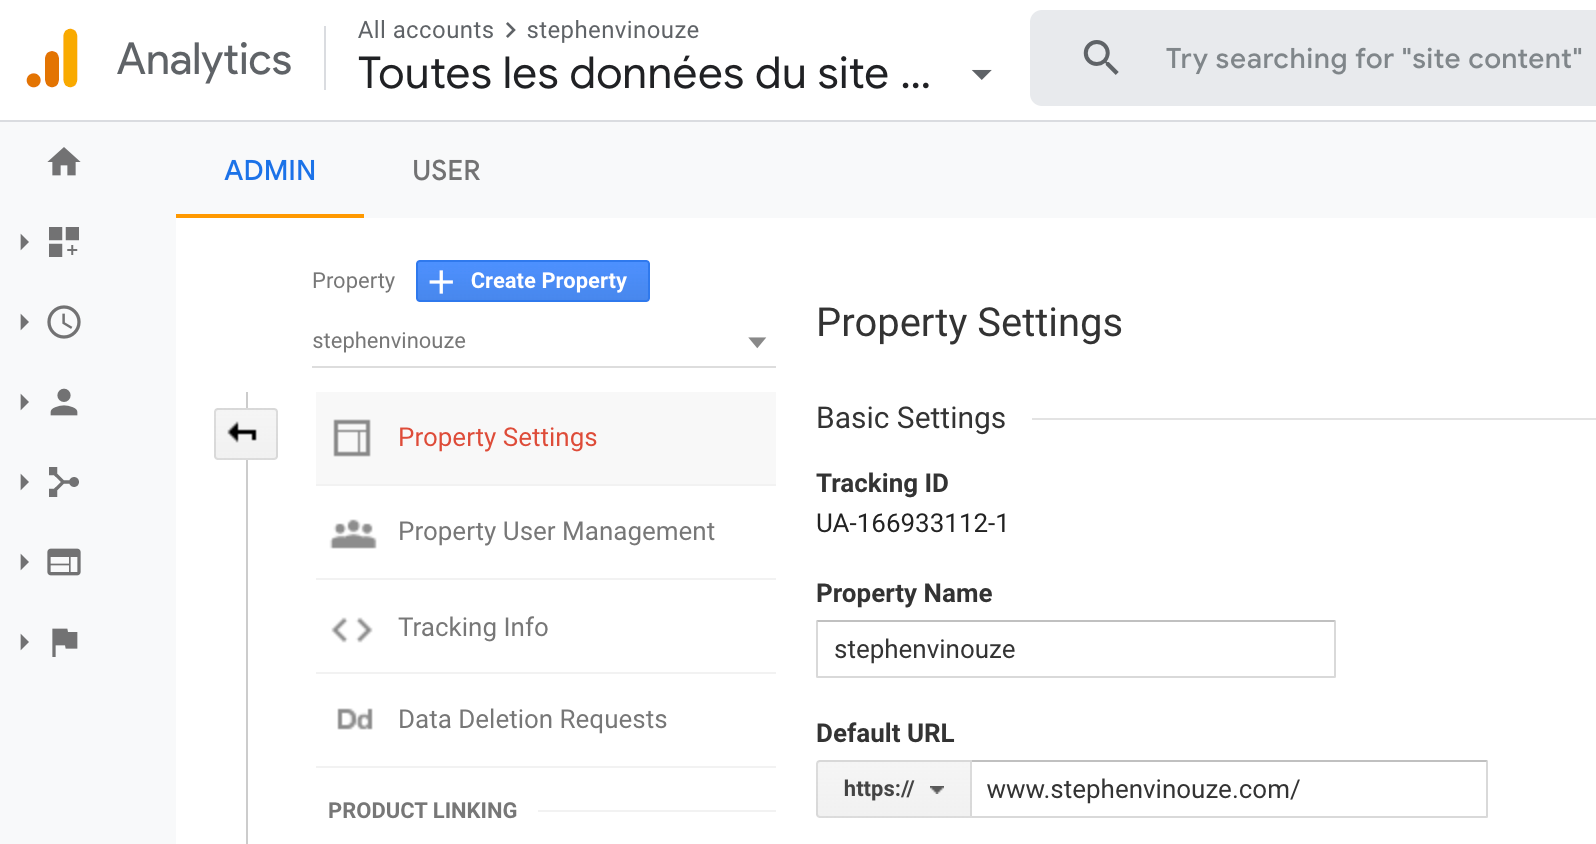
You’ll need to indicate a Google Analytics ID. That may seem tedious, but we will repeat the same process we did for Disqus and Mailchimp. You should be redirected to this page where you can find your Tracking ID. On the screenshot below, mine is UA-166933112–1. Copy yours in your _config.yml file, and you’re all set.
Again, remember to push and merge develop into master. Once redeployed, navigate from article to article. You should see the click count going up in your Google Analytics real-time dashboard.
Bonus: Customize Your Subdomain Name
At this point, your website is complete. It’s time to wrap everything up.
Your website is reachable at http://your_username.github.io/. Wouldn’t it be sweet to give it a friendlier domain name?
GitHub Pages allows you to associate your domain with a subdomain. So, for my case, all visitors browsing at http://stephenvinouze.github.io/ will be redirected to https://www.stephenvinouze.com/. Check it out yourself. Click on my GitHub link above.
Although I’ve kept my promise to deliver a website at no expense, this operation isn’t free. You’ll need to purchase a subdomain.
You can skip this part if you don’t want to spend money on it. However, owning your private domain will help your visitors find you. It gives a brand to your site.
If you’re willing to do this extra step, you’ll need a DNS provider. I’ve opted for Google Domains because it’s:
-
Easy to configure.
-
Reliable.
-
Cheap (a dozen euros per year).
Once purchased, you need to associate your custom domain with your GitHub account. On the same page where you edited your Git repository name at the beginning of this article, scroll down until you reach this section:
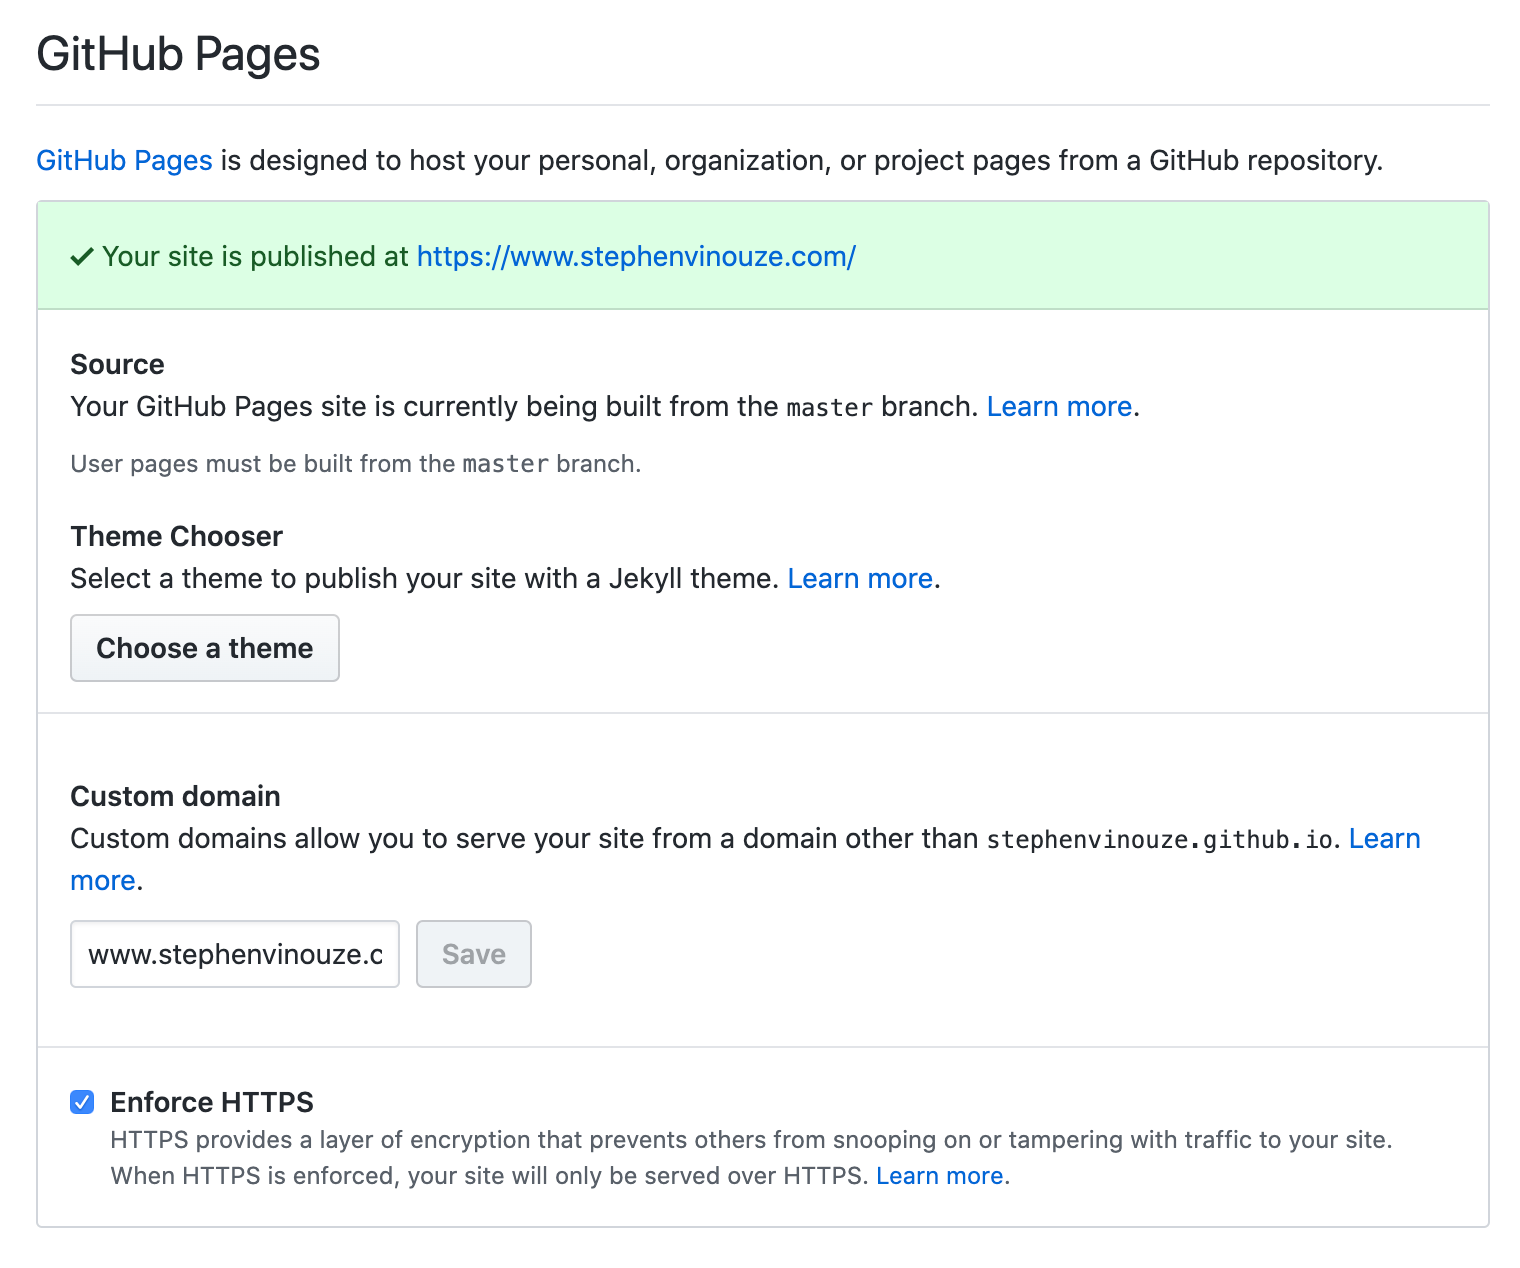
Fill up the “Custom domain” field with your purchased domain. I’d recommend enforcing HTTPS as well.
Save these changes and then go to your Google Domain’s console. Under the “DNS” section, replace the custom resource records with yours. This article will help you configure it.

All set! Try to access your website from your new URL.
Note that it can take up to a day before your new domain is reachable after purchasing it. It took me about an hour to get mine.
Feedback
Congratulations, you made it!
I’m amazed at how GitHub Pages made website building ridiculously trivial. Being backed up by Git makes it even more attractive to me for versioning reasons. I love to have control over my changes and know they’re safely saved somewhere.
But we must not forget the community developing pre-configured, all-inclusive templates. To thank them, please keep the credits inside your website — especially if you favored a free theme. That’s a small token to support their efforts.
Now I’d love to see what you came up with! And how long did it take you?
Don’t hesitate to drop a comment if there are any parts you struggled with or you believe some aspects should be more explicit.
The mic is yours!
 Never miss a story, subscribe to my newsletter