Don’t Fret With Git Rebase
Rebasing a Git branch is a cakewalk no matter what your teammates may tell you
If you’re familiar with Git, you may have heard about Git rebase. This powerful command allows you to attach your Git branch to any location on your Git tree.
However, I have often heard about developers’ disdain for this command. Instead, they favor Git merge — a safer yet limited way to deal with their branch history.
Let’s first illustrate how they differ with a trivial example.
Merge vs Rebase
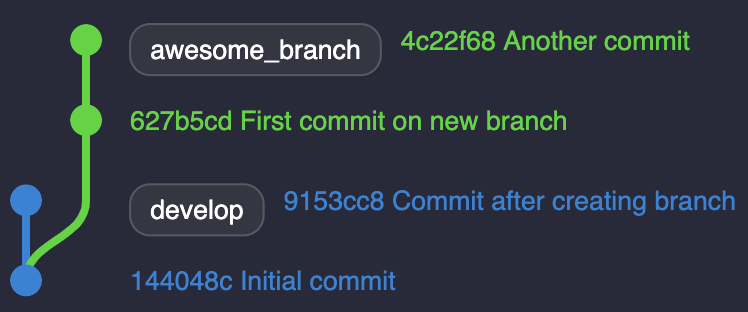
Say you have a base branch called develop. Imagine you create a branch from develop called awesome_branch. Meanwhile, someone commits on develop.
By the time you want to merge awesome_branch into develop, you’ll find out your branch is behind one commit. You could either:
-
Merge
developintoawesome_branch. -
Rebase
awesome_branchondevelop.
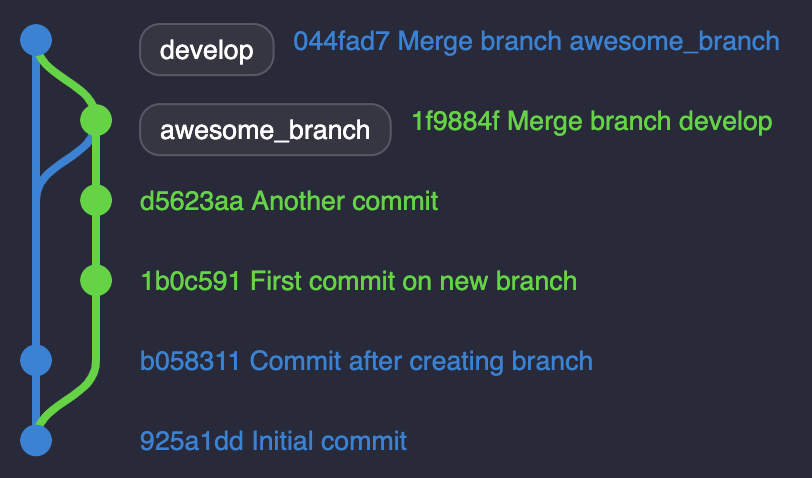
Merging will fuse both branches’ content, letting you handle all conflicts at once and resulting in a merge commit (the 1f9884f commit hash on the top graph below).
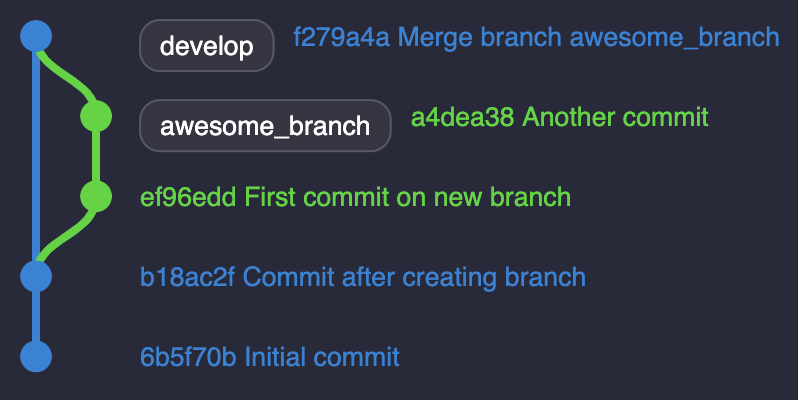
Rebasing, on the other hand, will unplug all your commits to apply them one by one into the target branch (from the b18ac2f commit hash on the bottom graph). If Git detects a conflict on a specific commit, the rebase will pause until you solve it.
Ultimately, both merge and rebase work perfectly and result in a slightly different tree.
What’s All the Fuss About?
As a developer, you’ll have moments where you have to save the day because of an erroneous Git maneuver. I had to struggle several times to understand what happened and where it went wrong. Even when I was working on a relatively small team — which is about seven developers — I could have dozens of parallel branches. Some may be intertwined with others, making it harder to read.
By using Git rebase, you may have noticed we saved a bridge and a merge commit. Even with a simple example, the right tree stands out by its optimal display. As mentioned above, having multiple branches at the same time will harden your work. It emphasizes how important having a compact tree is.
Keeping a linear tree eases versioning control.
If you’re interested in how to go even further into cleaning your Git tree, I encourage you to read “From Messy to Beauty with Git Rebase”.
Become the Rebase Wizard
First of all, you must understand that Git rebase is a destructive operation. Git generates new commits based on your previous commits onto the target branch. Your former commits will, therefore, be destroyed. Basically, you rewrite your Git history!
Just follow these steps:
-
Check out your branch you want to rebase.
-
Update your local repository.
-
Rebase your branch onto the desired branch.
-
Fix potential conflicts.
-
Ensure your tree is correct.
-
Push your local branch
Let’s draw our wand and break things down!
1. Check out your branch
You may choose to skip this step, as you can rebase any branch from anywhere. For clarity purposes, let’s do it anyway:
1
$ git checkout feature/awesome_branch
2. Update your local repository
Probably the most overseen step. Assuming that someone has pushed new commits on develop, forgetting this step will result in rebasing against an outdated branch. Even worse, the rebase itself will seem to work fine. You’ll just overlook the newest commits from the target branch.
People mostly fail to rebase their branches because they didn’t synchronize their local repository.
Without further ado, just fetch all your branches:
1
$ git fetch --all
3. Rebase your branch
A rule of thumb: Always rebase against your remote branch. Since you have fetched all your branches, you have ensured all your remote branches are up to date.
1
$ git rebase origin/develop
4. Fix your conflicts
Inevitably, you’ll have conflicts. When it happens, the rebase will stop at each commit conflicting with the target branch. You can either:
1
2
3
$ git rebase --continue // proceed the execution
$ git rebase --skip     // ignore this conflict
$ git rebase --abort    // cancel the operation
5. Check your Git tree
Our last line of defense before making a potential mistake. Invest a few seconds to ensure your tree is looking good. It can save you from losing precious commits!
6. Push your local branch
We’re finally ready to push our local branch:
1
$ git push --force
Since you rewrote your Git history, Git forces you to use the — force option. Make sure you check your Git tree before using this command!
Wrapping Up
Let’s sum up how to rebase. If you are lazy (like me), leverage Git aliases with ohmyzsh:
1
2
3
4
$ gco awesome_branch  // checkout your branch
$ gfa                 // fetch all your branches
$ grb origin/develop  // start rebase your branch onto develop
$ gp -f               // push force your local branch
That’s all, folks! I hope you feel more confident using this command.
If you want to go further with Git rebase, feel free to read my other articles.
 Never miss a story, subscribe to my newsletter